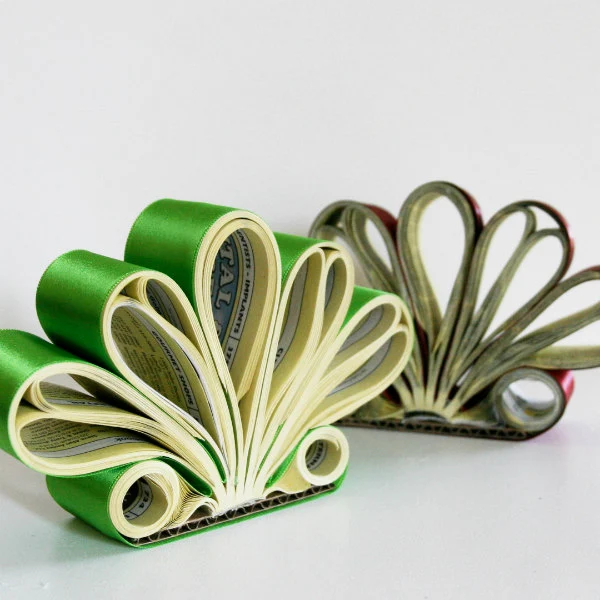
Enjoy this complete tutorial in which you're shown exactly how to make a stylish and useful Phone Book Letter Holder, one of twenty DIY paper craft projects included in my book, All Things Paper: 20 Unique Projects from Leading Paper Crafters, Artists, and Designers.
The project was originally featured on the popular Design*Sponge blog as part of the book's initial promotion. Now that Design*Sponge has ended its long run, I'm posting it here because a. it's as relevant an idea today as it was eight years ago when the book first launched and b. it was created by my friend in paper, Allison Patrick, whose work has been featured on this blog a number of times, and c. it's both an attractive and practical item for your desk that's an example of upcycling at its finest.
This is what Grace Bonney, owner of Design*Sponge, had to say about the project and the book:
"I've got a major soft spot for paper crafts. Mainly because they feel infinitely accessible. They're not cost-prohibitive (for the most part), you can so often re-use paper you have around the house and they are easy to practice at any skill level while you relax at home. This simple but clever project comes from the new book All Things Paper: 20 Unique Projects from Leading Paper Crafters, Artists, and Designers (Tuttle Publishing), an offshoot of the blog All Things Paper, run by Ann Martin."
"Ann's new book is filled with brand new DIY ideas created by a wide range of artisans who have been been featured prominently on her blog. In addition to being beautiful, the projects are all highly functional- an aspect about which Ann felt strongly. Each one is designed to show how paper, often thought of as disposable, can be a more permanent long-lasting craft material. Allison Patrick of Zipper8Lighting [now Aster and Quail] designed the project Ann is sharing with us today- an easy letter holder that's made from old phone books. Thanks, Ann and congrats! xo, grace"
PHONE BOOK LETTER HOLDER
by Allison Patrick
At least once a year a stack of phone books arrives in my building lobby where they languish for a few weeks until someone bundles them up for the recycling pile. In this Internet age you might not need old fashioned phone books for looking up information, but they can be put to good use and help with organization at the same time, as this pretty mail sorter demonstrates. It’s the perfect accessory for a front hallway or desk. Not only is it eco-friendly to use an otherwise discarded material, but the project cost is low because the phone book is free.
The petal design looks elegant even when not in use, and I love the bright pop of colorful ribbons that can be chosen to match the color scheme of any room. This project is not only fun and recycles wasted paper but is also fun and decorative. The finished letter holder measures 7 x 4 inches (18 x 10 cm). Because the phone book is divided in half and then cut into strip sections, quite a few letter holders can be made from just one phone book!
SUPPLIES AND TOOLS:
Phone book: Choose one with a fairly small width and length because a
larger phone book may cause the loops to be floppy. The one used here
measured 6.75 x 8.5 inches (17 x 22 cm) and was 1.75 inches (5 cm)
thick.
Colorful ribbon: 1-2 inches (2.5-5 cm) wide by approximately 60 inches (152 cm) long
Corrugated cardboard
Cutting mat
Scissors
Scrap paper
Paper clips
Glue gun with glue sticks
Metal ruler: A metal ruler is always better than a plastic or wooden
one when working with a cutting blade because the metal can't be
accidentally sliced.
Extendable cutting blade: I use Olfa; X-ACTO makes them too.
STEPS:
STEP 1: Open the phone book at its midpoint and cut through the center of the spine with a cutting blade or scissors to make equal halves. Working with one of the halves, cut a section of pages across the top or bottom that is the same width as the ribbon. Remove the remaining cover piece.
STEP 2: Cut a 31/2 inch (9 cm) piece of corrugated cardboard that is the same width as the ribbon. Glue the phone book spine to the center of the cardboard piece.
STEP 3: Use scrap paper as bookmarks to subdivide the phone book segment into seven sections. The five center sections should be twice as thick as the two outer sections. Although the following may sound complicated at first, an easy way to do this is to divide the phone book into four equal sections and then subdivide each quarter into three sections, resulting in twelve equal sections. Then use a single subdivided piece for each of the outer two sections, but use two of the subdivided pieces for each of the center five sections. Once the sections are subdivided, keep them separate by paper clipping each one as a unit until it is time to roll it.
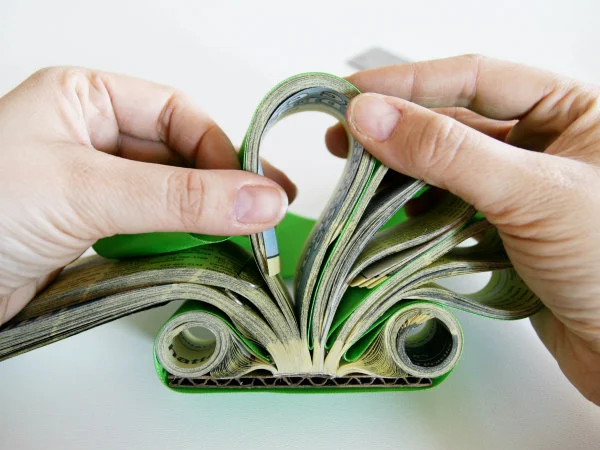
STEP 4: Pull six sections to the left, leaving one section to lean toward the right. Squeeze hot glue into the divide and insert the end of the ribbon. Take the single section (number 1) and roll it tightly outward until it reaches the cardboard. Holding the roll in place, squeeze glue onto the cardboard near the right edge, and carefully glue the ribbon so that it holds this section in its tight roll.
STEP 5: Turn the unit around and roll the other exterior section (number 7) into a tight, outward-facing roll to match the first section. Hold it in place while squeezing glue into the seam between the two sections (numbers 6 and 7) and press the ribbon in place, using a ruler to tuck it closely to the spine.
STEP 6: Take the next section (number 6) and subdivide it into three pieces. Curve the two pieces inward toward one another, using the third piece on the left to wrap over and around them.
STEP 7: Once again squeeze glue into the seam between the two sections (numbers 5 and 6) and use the ruler to press the ribbon into place.
STEP 8: Repeat Steps 6 and 7 for the next section.
STEP 9: Take the center section (number 4) and divide it into two pieces. Curve the left piece toward the center, then curve the right piece over and around the left piece, bringing the ribbon with it. Glue the ribbon into the seam between the two sections (numbers 3 and 4).
STEP 10: Repeat steps 6 and 7 for the final two sections.
STEP 11: After the ribbon has been glued over the last of these sections, it will be back at the first tight roll that was glued in place, and where the ribbon began between sections 1 and 2. Cut off any remaining ribbon close to the binding.
Add mail or other papers that need sorting and enjoy!
TIPS:
To make the cut through the depth of the phone book section, hold the ruler down very tightly and start slicing through the pages with a sharp, extendable cutting blade. Cut slowly over and over, trying not to slice through too much at once. Keep a firm grip on the ruler so it will hold the bulk of the book in place, resulting in an even cut. The slice doesn’t have to be perfect, however, because once the letter holder has been rolled, the imperfections won’t be noticeable. The section that is being sliced off will slide away from the cut line so it is easier to see. Continue slicing and extending the blade until the book section is sliced completely through.
In lieu of cutting your phone book with a craft blade, check with your local office supply store. It may have an industrial paper cutter that can slice through any book with ease.
All Things Paper, the book, was first introduced in this post in which you can see additional equally nifty projects that are included.
All Things Paper is an Amazon Associate.
If you should make a purchase using an affiliate link,
a small commission will be earned at no additional cost to you.
Thank you for helping to defray the cost of maintaining this site.


