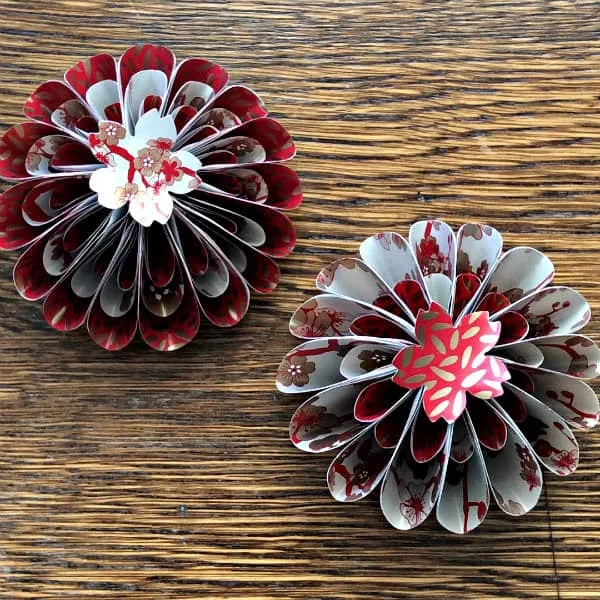
Here's a new style of paper ornament I've been working on recently. Wouldn't you like to make some as Christmas decorations? Read on!
Back in early April when so many of us around the world were grappling with the idea of a Covid lockdown, Marissa van der Valk of the Netherlands shared a tutorial on Instagram (@biediebiediesieraden) for making a paper brooch from old book pages as a pleasant diversion for the maker community. It's always nice to have a little paper craft project to focus on and I loved the interesting shape of her design.
Marissa creates all sorts of unique jewelry using papers that would otherwise be discarded. This eye-catching woven necklace is in her website shop... she made it from a Sunday newspaper and tea bag wrappers. Who would have guessed? The colors are so vibrant!
Back to the brooch... my fingers were itching to give it a try, but the thought of cutting out lots of circles by hand was daunting. And so I put it off until a few weeks ago and shared some of these photos on my Instagram stories as I went along. Surprisingly, the process was quicker than I expected, and of course if you have punches or an electronic cutter, it would be a breeze.
I had the idea that the brooch shape would be pretty as a tree ornament too, so I chose two pieces of paper from Tuttle Publishing's Asian-themed Red and Gold Gift Wrap Collection that I had on hand... one featured Japanese cherry blossoms and the other, grains of rice. It's very nice quality paper, has a bit of heft, but isn't too heavy, as well as a glossy sheen.
I folded the papers in half and traced eight circles of each size using small bottles and make up containers: 1.5", 2", and 2.5", giving me sixteen circles x 3 to make one ornament. I then folded them in half sharply and very gently in half again, not creasing the second fold... this gives the curved shape at the bottom of the sections.
No doubt the making would have gone a whole lot faster if I'd used a glue stick or quick-dry glue. Alas, I didn't have either, so settled for ordinary craft glue. What I did have that came in handy was a cherry blossom punch that I used to cover the centers that had become a bit messy while gluing. (Check on ebay for the punch.)
I pasted two punchees wrong sides together and when dry, cupped them a bit with my fingers.
Watch Marissa's short video Paper Object Fun as she takes you through the process step by step.
Free tutorial - Paper object fun from Biediebiedie on Vimeo.
You can also view all of the brooch steps via Marissa's Instagram Story.
Not only are these ornaments going to look great on the Christmas tree, but they can be gift toppers as well... a little gift on a gift. My husband commented that they look like Thanksgiving... I think he meant chrysanthemums and yes, they do, or dahlias perhaps.
I used fine metallic ornament cord for the hanging loop... pierced a hole near the edge of one of the curved sections with a sewing needle and threaded it through, tied a knot, and it was ready to hang. A nifty bonus is that the reverse side of the ornament is pretty too.
My previous post, Take Your Gift Wrapping to the Next Level, is where I featured Tuttle's 2020 gift wrap collections. They now have sixteen themed 'books' of wrapping paper... enough to make ornaments from now until the end of time!
Here's an example of using an ornament in place of a bow... a nice little gift on a gift!
All Things Paper is an Amazon and AWIN (Etsy) affiliate.
If you make a purchase, I will receive a
small commission at no additional cost to you.
Disclosure: This is not a sponsored post, however,
Tuttle sent me the papers that were used for this project.


