Enchanting Quilled Paper Portraits - Annabelle Fortin
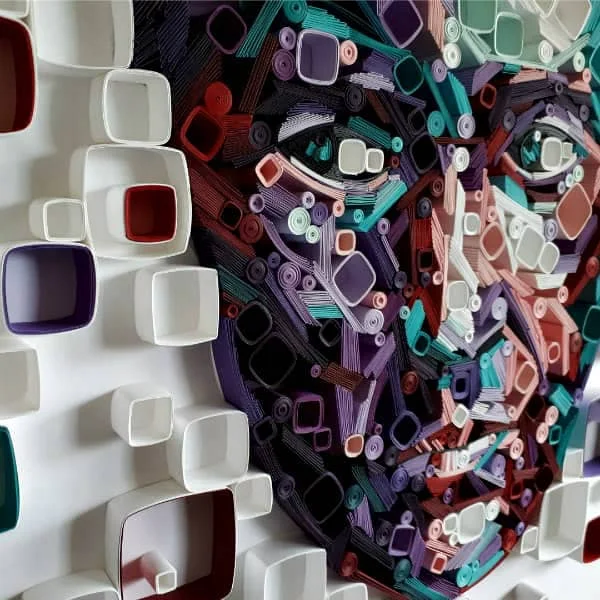
It's always exciting to come across a person who is clearly head over heels in love with their chosen form of paper art. Just a few years after discovering quilling, Annabelle Fortin is producing large, complex works in Yulia Brodskaya's notable style of folded paper bundles and geo shapes, yet is forging her own path in original portraiture.
I met Annabelle when she shared a new design with the Little Circles Facebook group. One look at her Facebook page
and, quick as a flash, asked if she would be willing to tell us her
quilling story... settle in to hear about her artistic journey and interesting life so far:
A bit of background:
I was born in Port-Cartier, a small town on the northern banks of the Saint Lawrence River in Quebec, Canada in 1980. Yes, I’m French! My interest in art has always been very present, drawing a lot as a kid and starting to paint eventually. I spent 16 years in the Canadian forces, working as a radar operator and later, a construction technician, travelling, and moving from city to city. Although this type of life is not for everyone, I took every advantage by taking art classes and workshop in each location.
Throughout the years, I worked with pens and pencils, spray paint, Paverpol [fabric hardener], acrylic and oil paints, photography, glass, clay, sand, even my own body through dance. I wanted to try everything! When I left the Canadian Forces in January 2015, these skills became especially useful. I slowly started by exposing some of my acrylic paintings in local coffee shops, breweries, and eventually art shows.
I was hired by Amber Academy to be their Arts teacher, I taught Art Camps for kids, and at the same time, became a dance teacher for Passion and Performance, an adult dance studio concentrating on the performing arts. I choreographed pieces and designed sets for local theater and performed quite a bit as well, singing, dancing and acting in the Vancouver Island art scene.
My story with paper:
It was in 2017 that I first discovered paper art. I came across Anant Nanvare’s rolled paper portraits and just could not believe that people made art with coiled papers like this! I fell completely in love and needed to try paper. So I did… and it was bad!
I did not have the proper tools, I did not know what kind of paper to buy and nobody was teaching paper portraits anywhere near me. I really wanted to achieve that kind of art, so I went to my local art store, got the only quilling book they had (for kids) and lucky for me, it came with a bunch of little tools.
I started, with my kids, making little cats and flowers and just experimenting for fun. It did not last long though; I needed to get to the complicated stuff right away! So, for my first real portrait with tools, I decided to cover an old painting in paper and tried to use my acrylic painting rules and knowledge to get there. It was not bad, but it wasn’t great so I had to try again, this time on a blank canvas. And there I think I achieved something not bad. Charlotte, My first “not bad” paper portrait! Now I think I can do this!
It is only in 2019, after moving from Vancouver Island to Ottawa, that I discovered Yulia Brodskaya’s book, Painting with Paper. I purchased it, read it cover to cover and tried using some of her techniques. It started working out very well!! (She is such an amazing artist!!!!) I made Masquerade, 24” x 24", my favorite piece so far.
The way I work:
I am an artist at my core, so I see beauty in everything and am easily inspired. I take a lot of photographs and keep many folders of inspiring images on my computer; the ones that are at the top of my list are in a “work on this” folder. I use the faces of my friends and family a lot as well.
The application PicsArt lets me superpose images and create new ideas, so I work with it in freehand collages and for watermarking. I use card stock paper mostly, 176gsm to 280gsm. Linen texture card is my favorite as it folds and rolls very well, and compared to other card stock, the edges are much darker. I cut all the sheets into ½ inch strips by hand. I love using a lot of colors in my art, but lately I have been trying to use more natural colors.
What I like the most about the process is how calming it is. I get to sit quietly, listening to audiobooks all day (sometimes singing all day) while my three kids are in school. I just downloaded an audiobook to learn Spanish; why not? My hands are busy, but my mind can still learn!
Now that winter is coming and we live where there is quite a bit of snow during the winter and the temperatures are very cold, I am entering what I call Art-bernation, where I will be creating almost every day for the next six months. During the spring and summer months, because we own almost seven acres and I am our family’s food grower, I spend most days working the fields.
How I start:
I usually start drawing my image onto the canvas. Initially I used gridlock, but now I have a projector. My canvases are big sheets of ¼” plywood that I cut to a desired size. I then add depth by gluing ripped paper, darker in darkest areas of my subject and lighter where the light hits the subject the most.
A good trick to help seeing those areas is looking at your subject by squinting your eyes to really see dark and light areas. This phase ends up looking very much like paper POP ART!
Then I start folding, rolling, and gluing with three versions of my subject’s picture on my computer screen; one bright, one normal, and one dark: it helps me see the details better.
For tools, I use the common rolling pin, needle pins, tweezers, teeny-tiny sharp scissors, wood skewers, and clips. One thing I would really like is to learn to make perfect tight coils without the middle part showing. If anyone has any pointers, I would be so grateful.
I consider myself quite new at paper art; I am still learning, but I am really in love with the medium. The look of it and the feel of it are by far my favorite features. There is nothing else I want to do!
Thanks Annabelle, I look forward to seeing your future work. As for smoothing out the pesky little crimp in the center of a tight coil, I have good luck with this type of clay modeling tool... just gently push the tip into the center after the coil is glued in place and rotate.
You'll find Annabelle Fortin on Facebook and Instagram.


