Quilled Christmas Cards with Gilded Tree Ornament Tutorial
If you're running behind (like me) and have yet to send holiday cards, you might decide to make just a few special ones for people you don't see throughout the year in real life or via social media. In other words, trim your list. Here's an idea for a unique quilled Christmas card that requires very little quilling, so it goes together quite quickly and can be safely mailed in a regular envelope with a bit of bubble wrap placed over the ornament.
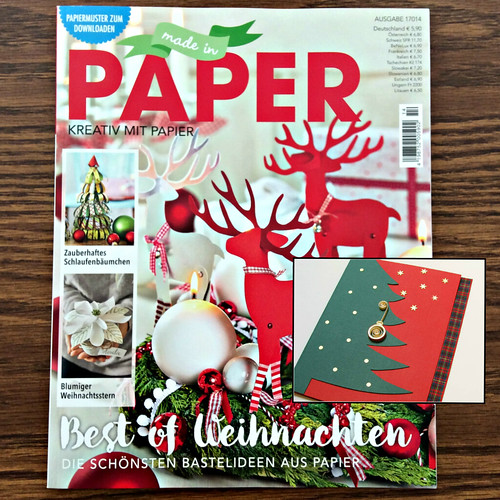
The card is featured in the current issue of the German magazine, Made in Paper. When I received the issue in the mail, I posted the photo below on Instagram and promised to share a tutorial for it, so here goes...
Card Making Supplies:
Card stock - red, green, metallic gold
Paper trimmer with cutting and scoring blades (or use a bone folder to score card stock)
Double-sided tape or glue stick - to adhere card layers
Ribbon - plaid, about 3/8 inch x 5.5 inches
Hole punch - for tree lights, 1/8 inch
Snowflake punch - the punch I used has been discontinued, but here are several alternatives by Punch Bunch - Mini Snowflake and Tahoe Snowflake.
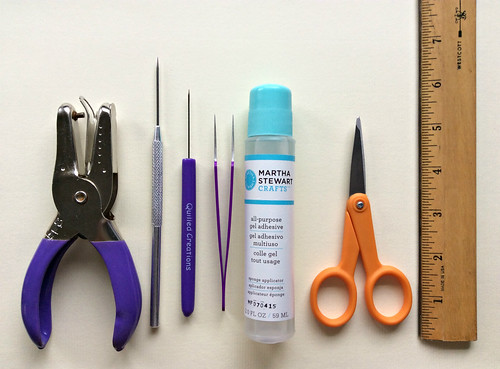
Quilling Supplies:
Paper piercing tool - to apply glue to quilled coils (or use a pin, toothpick or your quilling tool)
Quilling tool
Tweezers - fine-tip
Glue - I like to use clear gel adhesive
Scissors - detail
Ruler
Card Making Steps:
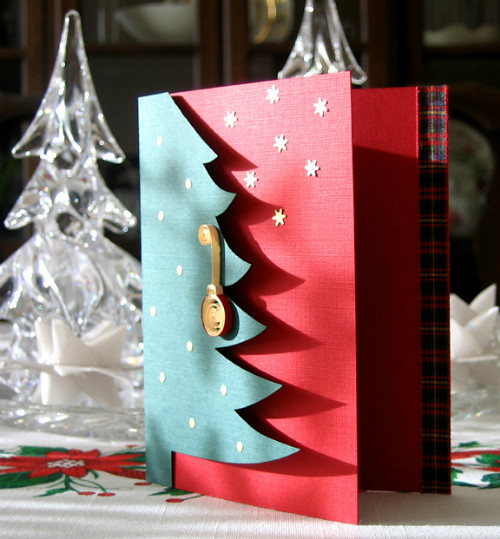
1. Cut a piece of red card stock that measures 4.5 x 10.75 inches. Score and fold at the 5.125-inch mark to create an uneven side-fold card that measures 4.5 x 5.5 inches when closed. This allows room for the ribbon to show along the right hand side when the card is closed.
2. Referring the the photo, draw a 5.5-inch tree on green card stock and cut it out. Score and fold the left edge under 1/4-inch and use double-sided tape or a glue stick to adhere the fold around the card spine.
3. Punch gold metallic ornament dots/stars and glue them in place with the help of tweezers.
4. Use tape or a glue stick to adhere the ribbon along the right side of the card.
Quilled Ornament Steps:
If you are new to quilling, learn the basics in this Quilling 101 post.
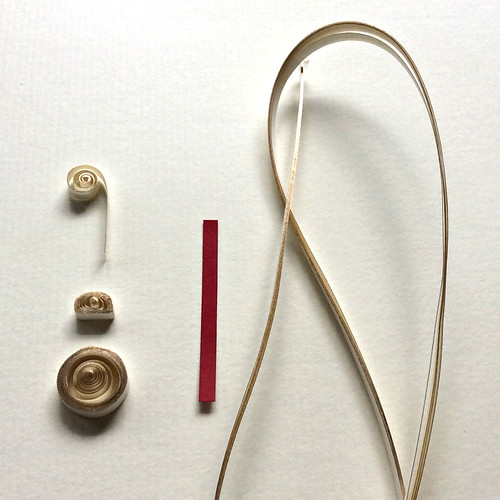
1. Roll a loose coil using a 13-inch strip of metallic-edge ivory quilling paper. When the strip has been rolled, slipped off the tool and allowed to expand, pull the end to create a thickened outer edge to define the shape. Glue the end.
2. Butt a 2-inch strip of red quilling paper against the end of the ivory strip and glue it once around the coil.
3. Make a rectangle using a 5-inch strip of metallic-edge ivory quilling paper. To make a rectangle, first make a marquise shape by pinching opposite sides of a loose (round) coil, then turn it slightly and make another set of opposite pinches. Glue the end at a corner and trim any excess paper.
4. Make a loose scroll as the ornament hanger using a 3-inch strip of metallic-edge ivory quilling paper.
5. Glue the three quilled components together on a non-stick work board and adhere the ornament to the tree.
Brand new to quilling? Take your time and practice until your fingers become used to working with narrow strips. It's only paper and glue... you can do this!
Use the smallest amount of glue possible for a neat look.
Tweezers are helpful when gluing quilling to a card. For example, use them to gently touch the underside of the ornament to a shallow puddle of glue that you have spread on a plastic lid or waxed paper, and place it directly onto the card. Don't slide it around as that will leave a shiny snail trail of glue.
Find lots more answers to your quilling questions on my Quilling FAQ page and happy quilling!

The card is featured in the current issue of the German magazine, Made in Paper. When I received the issue in the mail, I posted the photo below on Instagram and promised to share a tutorial for it, so here goes...
Card Making Supplies:
Card stock - red, green, metallic gold
Paper trimmer with cutting and scoring blades (or use a bone folder to score card stock)
Double-sided tape or glue stick - to adhere card layers
Ribbon - plaid, about 3/8 inch x 5.5 inches
Hole punch - for tree lights, 1/8 inch
Snowflake punch - the punch I used has been discontinued, but here are several alternatives by Punch Bunch - Mini Snowflake and Tahoe Snowflake.

Quilling Supplies:
Quilling paper - 1/8 inch standard width; gold-edge ivory, red
Paper piercing tool - to apply glue to quilled coils (or use a pin, toothpick or your quilling tool)
Quilling tool
Tweezers - fine-tip
Glue - I like to use clear gel adhesive
Scissors - detail
Ruler
Plastic lid or waxed paper - to use as a glue palette and work board
Damp cloth - to keep fingers and tools free of glue
More quilling and paper craft supplies I recommend can be found in my Amazon shop.
Damp cloth - to keep fingers and tools free of glue
More quilling and paper craft supplies I recommend can be found in my Amazon shop.
Card Making Steps:
1. Cut a piece of red card stock that measures 4.5 x 10.75 inches. Score and fold at the 5.125-inch mark to create an uneven side-fold card that measures 4.5 x 5.5 inches when closed. This allows room for the ribbon to show along the right hand side when the card is closed.
2. Referring the the photo, draw a 5.5-inch tree on green card stock and cut it out. Score and fold the left edge under 1/4-inch and use double-sided tape or a glue stick to adhere the fold around the card spine.
3. Punch gold metallic ornament dots/stars and glue them in place with the help of tweezers.
4. Use tape or a glue stick to adhere the ribbon along the right side of the card.
Quilled Ornament Steps:
If you are new to quilling, learn the basics in this Quilling 101 post.
1. Roll a loose coil using a 13-inch strip of metallic-edge ivory quilling paper. When the strip has been rolled, slipped off the tool and allowed to expand, pull the end to create a thickened outer edge to define the shape. Glue the end.
2. Butt a 2-inch strip of red quilling paper against the end of the ivory strip and glue it once around the coil.
3. Make a rectangle using a 5-inch strip of metallic-edge ivory quilling paper. To make a rectangle, first make a marquise shape by pinching opposite sides of a loose (round) coil, then turn it slightly and make another set of opposite pinches. Glue the end at a corner and trim any excess paper.
4. Make a loose scroll as the ornament hanger using a 3-inch strip of metallic-edge ivory quilling paper.
5. Glue the three quilled components together on a non-stick work board and adhere the ornament to the tree.
Quilling Tips:
Brand new to quilling? Take your time and practice until your fingers become used to working with narrow strips. It's only paper and glue... you can do this!
Use the smallest amount of glue possible for a neat look.
Tweezers are helpful when gluing quilling to a card. For example, use them to gently touch the underside of the ornament to a shallow puddle of glue that you have spread on a plastic lid or waxed paper, and place it directly onto the card. Don't slide it around as that will leave a shiny snail trail of glue.
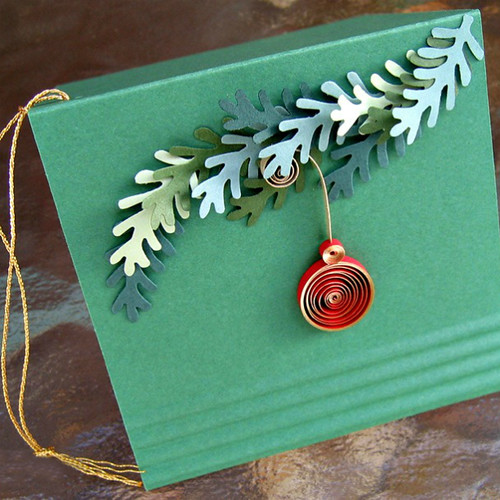
You might recall this gift tag that I made for CardMaker magazine several years ago, as I'm pretty sure I shared the photo previously. It's a variation on the same idea... I used metallic-edge crimson paper and an indented tight coil where the hanger meets the ornament. Ferns punches in a few shades of green card stock make up the evergreen branch. (Punch Bunch Fern)
Find lots more answers to your quilling questions on my Quilling FAQ page and happy quilling!


