Asymmetric Fringed Flowers Tutorial
It was my aunt-in-law's birthday over the weekend and we celebrated with a surprise party. She loves to garden and is fond of pastels, so I wrapped her gift in floral paper and attached this handmade card that features quilled fringed flowers.
I don't think I've ever shared the specifics on how to make an asymmetric fringed flower... it reminds me of a spider chrysanthemum (spider mum for short) - a funny name, but one that fits due to the
leggy petals. I used pearlized paper to make the card blank, flowers, and leaves... it's a joy to work with such a pretty sheen!
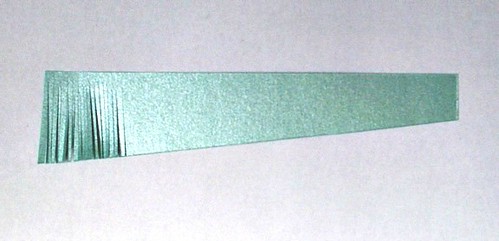
Pearlized paper is carried by most quilling and general paper suppliers and is sold as 8.5 x 11 inch sheets. It's also available as quilling strips, but because I wanted to cut my own wide, angled strips (about 1-1.25 inches at the widest end), I chose sheets. You'll need tacky glue and a bit of extra patience when working with pearlized paper because of the slick surface.
a. Make fine, even cuts with detail scissors, snipping from the long, angled edge toward the straight edge.
I tucked a couple of leaves under the fringe of each flower... here's an easy way to make them:
a. Fold a small rectangle in half lengthwise.
b. With the paper still folded, cut a half-leaf shape along the open edge, then make tiny snips on the edge.
c. Open the leaf and curve the tip.
Have fun experimenting with fringed flowers... there's no reason why you can't make huge ones to use as party decor. For lots more ideas, check out this post.
b.
When the strip is fully fringed, roll it snugly on a quilling needle tool,
stiff wire, or cocktail stick starting at the narrow end.
c. Apply a dot of glue at the end, fluff out the petals, and curl them downward with scissors as if you were curling ribbon.
The trick is in trying different strip lengths and widths to get the flower size you want - there's no reason why you can't make huge flowers to hang as party decor just by starting with a very large, angled strip.
If you're making flowers for greeting cards and would like them to have centers like mine, glue a 3 inch strip of 1/8 inch quilling paper to the base of the narrow end before rolling.
I tucked a couple of leaves under the fringe of each flower... here's an easy way to make them:
a. Fold a small rectangle in half lengthwise.
b. With the paper still folded, cut a half-leaf shape along the open edge, then make tiny snips on the edge.
c. Open the leaf and curve the tip.
Quilling and other paper craft products I recommend can be found in my Amazon shop.


