
This is Part 3 of a three part quilled jewelry series. Each pattern is designed for the person
who is brand new to the craft. The first two designs can be found here and here. All are for personal use only.
If you like to give handmade presents, here's an idea... make stylish drop earrings from gilded-edge quilling paper. Your girlfriends will be thrilled at how lightweight and comfortable they are to wear, not to mention surprisingly durable; they'll even survive New Year's Eve and beyond!

Quilling isn't nearly as complicated as you might think... after a bit
of practice it becomes very relaxing to do, just like knitting or
crocheting. Another nice thing is that the supply list is short - you
probably have most everything on hand with the added bonus that a basic
quilling tool and paper strips are inexpensive.
Gold-edged strips, even though they look rich and oh-so-shiny are just $5.00/package; many pairs of earrings can be made from one purchase. Silver and copper-edged strips are available too. I ordered my favorite precision slotted tool (blue one in the supplies photo) from Japan, but it isn't a necessity. A slotted tool, available in craft stores and from any online quilling supplier, costs just a few dollars. If you prefer your coils to not have a center crimp, use a needle tool (wooden handle in photo) or substitute a stiff wire, tapestry needle, or corsage pin.
Enough chit-chat, let's get on with the how-to!
Supplies:

Quilling paper - gold-edged black (1/8 inch standard strips) or cut your own light to medium weight paper in any color using a craft knife, metal-edged ruler, and cutting mat. (A selection of shiny metallic-edge strips is sold by Quilled Creations.)
Quilling tool - slotted or needle
Glue - I like Scotch Clear Glue but any craft glue will do. Aleene's Tacky Glue is another good one.
Scissors
Ruler
Tweezers - long with a precision tip
Paper piercing tool or cocktail stick - to form ring coil and to apply glue
T-pin or ball head pin - to shape domed tight coils
Non-stick surface - use as glue palette and work board. An acrylic sheet, waxed paper, or Styrofoam tray are fine too; I often use a jar lid.
Damp cloth - sticky-glue fingers and quilling don't mix!
Jewelry pliers - 2, mine are flat nose pliers
Jump ring - gold, 5 mm (2)
Earring Wire - gold (2)
Additional quilling and paper craft supplies can be found in my Amazon shop.

Instructions:
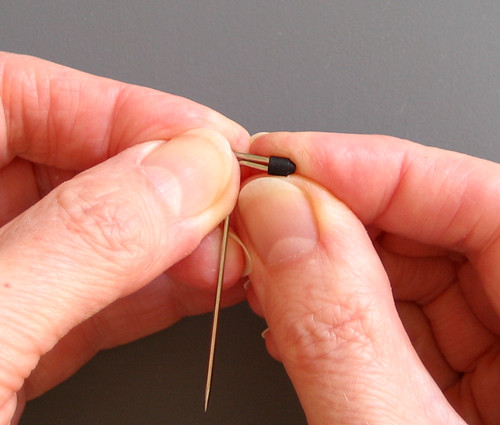
1. Make a ring coil: Roll a 2 inch strip on a paper piercing tool or cocktail stick. Glue end and slide coil off tool. (make 2) A jump ring will need to slide through the ring coil so be sure the opening is large enough to accommodate one.

2. Make a domed tight coil: Roll a 2 inch strip on quilling tool of choice. Glue end in place without allowing strip to loosen. Slide coil off tool.

Press against one side of coil with a T-pin or ball head pin to create a dome.
Apply a tiny amount of glue inside the dome to preserve the curve. (make 4)

Note: for ring coils and tight coils, work with strips that have a torn end. A torn end will glue more smoothly than a sharp cut and the coil will appear perfectly round.
3. Make 6 marquise coils:
7 inch - make 2
11 inch - make 2
17 inch - make 2
To make a marquise coil: Roll strip on tool and allow it to relax.


Pinch a sharp point at each end. Glue end in place and trim excess paper.

Hold coil at points and gently compress them toward one another all the way to the center. When the coil is released, the inner coils will spin around and create what Licia Politis has named a vortex coil - a good way to think of it! The vortex shows best in a densely quilled coil with lots of rotating spirals, so don't skimp on the length of the strip.

4. Assemble components: Glue coils together to make earrings as shown. Allow glue to dry for a few minutes, turn earrings over, and apply reinforcing dots of glue to all join spots with the tip of a pin.

Allow glue to dry overnight.

5. The next day, slide an opened jump ring through each ring coil and slip on an earring wire. Close jump ring, wear, and receive compliments - no one will believe your golden earrings are made of paper!

Notes:
The finished earrings are about 2 inches in length, not including the hardware.
You'll need far less glue than you expect. When adhering coils to one another, apply glue sparingly with the tip of a pin, paper piercer, or use a fine-tip glue bottle available from quilling suppliers.
I don't apply a fixative to my necklace pendants and earrings as they don't receive a lot of hard use, but if you live in a high humidity area, you might want to apply a spray or brush-on fixative.
In lieu of ordering gilded-edge paper, try adding your own metallic shine with a Krylon leafing pen or even a metallic gel pen. You might also press a silver, gold, or copper ink pad against rolled coils for a gilded effect.
You'll find many more of my quilled jewelry patterns in my book The Art of Quilling Paper Jewelry. Perhaps add it to your wish list or ask your local library to place an order if they don't already have it on the shelf.
If you'd like to receive my occasional and free All Things Paper newsletter that features posts like this one, sign up here.
If you like to give handmade presents, here's an idea... make stylish drop earrings from gilded-edge quilling paper. Your girlfriends will be thrilled at how lightweight and comfortable they are to wear, not to mention surprisingly durable; they'll even survive New Year's Eve and beyond!
Gold-edged strips, even though they look rich and oh-so-shiny are just $5.00/package; many pairs of earrings can be made from one purchase. Silver and copper-edged strips are available too. I ordered my favorite precision slotted tool (blue one in the supplies photo) from Japan, but it isn't a necessity. A slotted tool, available in craft stores and from any online quilling supplier, costs just a few dollars. If you prefer your coils to not have a center crimp, use a needle tool (wooden handle in photo) or substitute a stiff wire, tapestry needle, or corsage pin.
Enough chit-chat, let's get on with the how-to!
Supplies:
Quilling paper - gold-edged black (1/8 inch standard strips) or cut your own light to medium weight paper in any color using a craft knife, metal-edged ruler, and cutting mat. (A selection of shiny metallic-edge strips is sold by Quilled Creations.)
Quilling tool - slotted or needle
Glue - I like Scotch Clear Glue but any craft glue will do. Aleene's Tacky Glue is another good one.
Scissors
Ruler
Tweezers - long with a precision tip
Paper piercing tool or cocktail stick - to form ring coil and to apply glue
T-pin or ball head pin - to shape domed tight coils
Non-stick surface - use as glue palette and work board. An acrylic sheet, waxed paper, or Styrofoam tray are fine too; I often use a jar lid.
Damp cloth - sticky-glue fingers and quilling don't mix!
Jewelry pliers - 2, mine are flat nose pliers
Jump ring - gold, 5 mm (2)
Earring Wire - gold (2)
Additional quilling and paper craft supplies can be found in my Amazon shop.
1. Make a ring coil: Roll a 2 inch strip on a paper piercing tool or cocktail stick. Glue end and slide coil off tool. (make 2) A jump ring will need to slide through the ring coil so be sure the opening is large enough to accommodate one.
Press against one side of coil with a T-pin or ball head pin to create a dome.
Apply a tiny amount of glue inside the dome to preserve the curve. (make 4)
Note: for ring coils and tight coils, work with strips that have a torn end. A torn end will glue more smoothly than a sharp cut and the coil will appear perfectly round.
7 inch - make 2
11 inch - make 2
17 inch - make 2
To make a marquise coil: Roll strip on tool and allow it to relax.
Slip this loose coil off tool and compress it between thumb and index finger.
Note: Use a straight pin to evenly space the inner coils if necessary.
Note: Use a straight pin to evenly space the inner coils if necessary.
Pinch a sharp point at each end. Glue end in place and trim excess paper.
Hold coil at points and gently compress them toward one another all the way to the center. When the coil is released, the inner coils will spin around and create what Licia Politis has named a vortex coil - a good way to think of it! The vortex shows best in a densely quilled coil with lots of rotating spirals, so don't skimp on the length of the strip.
4. Assemble components: Glue coils together to make earrings as shown. Allow glue to dry for a few minutes, turn earrings over, and apply reinforcing dots of glue to all join spots with the tip of a pin.
Allow glue to dry overnight.
5. The next day, slide an opened jump ring through each ring coil and slip on an earring wire. Close jump ring, wear, and receive compliments - no one will believe your golden earrings are made of paper!
The finished earrings are about 2 inches in length, not including the hardware.
You'll need far less glue than you expect. When adhering coils to one another, apply glue sparingly with the tip of a pin, paper piercer, or use a fine-tip glue bottle available from quilling suppliers.
I don't apply a fixative to my necklace pendants and earrings as they don't receive a lot of hard use, but if you live in a high humidity area, you might want to apply a spray or brush-on fixative.
In lieu of ordering gilded-edge paper, try adding your own metallic shine with a Krylon leafing pen or even a metallic gel pen. You might also press a silver, gold, or copper ink pad against rolled coils for a gilded effect.

You'll find many more of my quilled jewelry patterns in my book The Art of Quilling Paper Jewelry. Perhaps add it to your wish list or ask your local library to place an order if they don't already have it on the shelf.
If you'd like to receive my occasional and free All Things Paper newsletter that features posts like this one, sign up here.
All Things Paper is an Amazon affiliate.


