Quilled Snowflake Patterns
Would you believe more people search this site for snowflake patterns than anything else all year long?! I suppose it's not really too surprising... if a person is familiar with quilling, they're probably also aware of how beautifully it meshes with intricate snowflakes.
I promised another snowflake pattern a while ago, so to make it up to you, I actually have three pretties to share today, thanks to two quilling friends who generously provided the photos and instructions.
If you've never quilled before, you may want to refer to my Quilling Basics or Quilling 101 tutorials that show techniques and tools. There's no need to buy special paper until you see if you like making snowflakes - 1/8 inch strips of basic computer paper will work just fine. This helpful lined grid can be printed out and placed under a sheet of clear acrylic. Use it as a guide while assembling coils and the result will be a perfectly balanced snowflake.
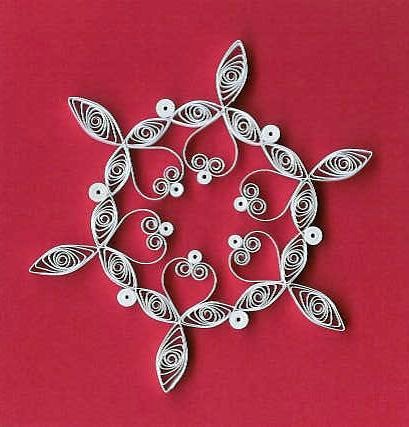
Snowflake 1
Make:
3 inch loose coil (make 1)
2 inch heart scroll - glue coils together at top (make 6)
1 inch tight coil (make 6)
3 inch marquise/cat eye (make 12)
Deb suggests using clear acrylic spray and iridescent dust to add strength and shimmer to quilled snowflakes. She sprinkles the dust on immediately after spraying so it adheres well, and gives it just a light sprinkling to prevent clogging the airy coils.
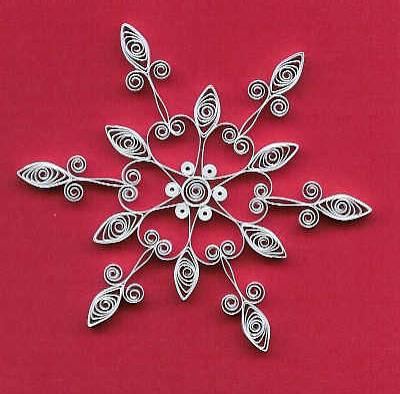
The third and more complex snowflake pattern [edit: no longer available] can be found on the website of the North American Quilling Guild. It was created by Molly Smith of the blog, It's Molly Smith, and would be a lovely one to try once you've mastered simpler patterns - not that it's harder to do, just more time consuming. Making snowflakes is methodical and satisfying because they're just so pretty!
If you'd like to receive my occasional All Things Paper newsletter that features posts like this one, sign up here.
Quilling and paper craft supplies I recommend can be found in my Amazon shop.
I promised another snowflake pattern a while ago, so to make it up to you, I actually have three pretties to share today, thanks to two quilling friends who generously provided the photos and instructions.
If you've never quilled before, you may want to refer to my Quilling Basics or Quilling 101 tutorials that show techniques and tools. There's no need to buy special paper until you see if you like making snowflakes - 1/8 inch strips of basic computer paper will work just fine. This helpful lined grid can be printed out and placed under a sheet of clear acrylic. Use it as a guide while assembling coils and the result will be a perfectly balanced snowflake.
Snowflake 1
Make:
3 inch loose coil (make 1)
2 inch heart scroll - glue coils together at top (make 6)
1 inch tight coil (make 6)
3 inch marquise/cat eye (make 12)
2 inch V scroll - glue coils together at top (make 6)
Refer to the picture above and work outward from the center:
Glue the heart scrolls evenly around the loose coil.
Glue a tight coil inside the point of each heart scroll.
Glue a marquise between each heart scroll.
Glue a V scroll point between the coils of each heart scroll.
Glue a marquise to each V scroll between the coils.
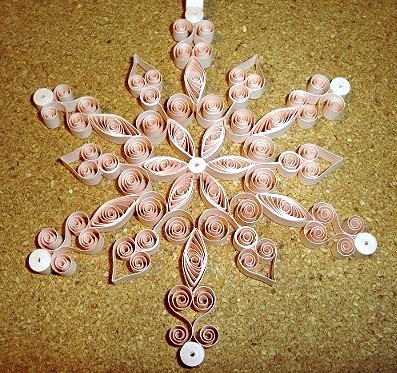
Snowflake 2
Make:
1 inch tight coil (make 6)
2 inch heart scroll (make 6)
3 inch marquise (make 12)
2 inch tight coil (make 6)
4 inch marquise (make 6)
Refer to the picture above and work outward from the center:
Glue two 3 inch marquises together to form little teepees. Allow to dry thoroughly.
Glue the six pairs of marquises to one another forming a circle. Allow circle to dry.
Glue a 2 inch tight coil between each marquise pair on the outside of the circle.
Glue a heart scroll on the inside of each marquise pair.
Glue a 1 inch tight coil at the top of each heart scroll between the coils.
Glue a 4 inch marquise perpendicular to each marquise pair.
The first two patterns were designed by Deb Mackes who makes really lovely flakes and doesn't even use a grid to line up the coils - amazing! She has also shared a couple of patterns in the past that you'll find here and here.
Refer to the picture above and work outward from the center:
Glue the heart scrolls evenly around the loose coil.
Glue a tight coil inside the point of each heart scroll.
Glue a marquise between each heart scroll.
Glue a V scroll point between the coils of each heart scroll.
Glue a marquise to each V scroll between the coils.
Snowflake 2
Make:
1 inch tight coil (make 6)
2 inch heart scroll (make 6)
3 inch marquise (make 12)
2 inch tight coil (make 6)
4 inch marquise (make 6)
Refer to the picture above and work outward from the center:
Glue two 3 inch marquises together to form little teepees. Allow to dry thoroughly.
Glue the six pairs of marquises to one another forming a circle. Allow circle to dry.
Glue a 2 inch tight coil between each marquise pair on the outside of the circle.
Glue a heart scroll on the inside of each marquise pair.
Glue a 1 inch tight coil at the top of each heart scroll between the coils.
Glue a 4 inch marquise perpendicular to each marquise pair.
The first two patterns were designed by Deb Mackes who makes really lovely flakes and doesn't even use a grid to line up the coils - amazing! She has also shared a couple of patterns in the past that you'll find here and here.
Deb suggests using clear acrylic spray and iridescent dust to add strength and shimmer to quilled snowflakes. She sprinkles the dust on immediately after spraying so it adheres well, and gives it just a light sprinkling to prevent clogging the airy coils.
The third and more complex snowflake pattern [edit: no longer available] can be found on the website of the North American Quilling Guild. It was created by Molly Smith of the blog, It's Molly Smith, and would be a lovely one to try once you've mastered simpler patterns - not that it's harder to do, just more time consuming. Making snowflakes is methodical and satisfying because they're just so pretty!
A big thanks to both Deb and Molly for sharing their expertise. Think {paper} snow!
If you'd like to receive my occasional All Things Paper newsletter that features posts like this one, sign up here.
Quilling and paper craft supplies I recommend can be found in my Amazon shop.
Really lovely work!
ReplyDeleteSuperb snowflakes
ReplyDeleteLots of great information, Ann! I do notice searches for snowflakes in July also! Thank you for featuring my snowflake. And thanks for sharing the grid!
ReplyDelete-Molly
Thanks for the new patterns! I love making snowflakes but I usually "freehand" it.
ReplyDeleteThank you Ann!They look really pretty. I am also looking for snowflake patterns.
ReplyDeleteThank you very much, Ann, for these beautiful patterns! I started making snowflakes and more patterns are more than welcomed always:)
ReplyDeleteThanks so much for posting these! I guess like most people I really love the quilled snowflakes.
ReplyDeleteThese are truly beautiful. Funny I've been making crocheted snowflakes into Christmas cards and for the first time i'm trying to create my own.
ReplyDeletethey're each delightful snowflake designs; I love the tip re the acrylic/grid for under your work for exactness.
ReplyDeleteThey are beautiful! Thank you Ann, I've pinned them on my pinboard!
ReplyDeleteReally lovely selection of snowflakes and their great creators. I checked them all, couldn't say which one is the prettier. And, like every year, snowflakes are still a riddle to me. Have to give it a try, again!
ReplyDeleteSuzana
These are just so beautiful! Thank you, Ann for sharing with us.
ReplyDeletewow these are stunning! so intricate! quilling really is pretty fantastically suited to making snowflakes, isn't it?
ReplyDeletewe are supposed to get the first snow of the season on saturday. boo! i much prefer the quilled kind!
these are so pretty, thanks for sharing the patterns. Now if I can just find some time
ReplyDeleteThese are just lovely Ann. I'm itching to have a go at paper-quilling. One day! I've finally added your blog to my reader so looking fwd to catching up on more of your posts.
ReplyDeleteamazing!
ReplyDeleteThank you for sharing...I made them for Christmas and they were beautiful!
ReplyDeleteI'm happy to hear that!
DeleteThis may sound like a silly question but I'm new to quilling. When you say a 1 inch coil or a 4 in marquis does that mean that's how long the strip of paper is before you quill it? Thank you.
ReplyDeleteHi and yes, the measurement is strip length. In case you haven't found your way to my Quilling FAQ page, there might be more tips that will help get you started: http://www.allthingspaper.net/p/quilling-faq.html
DeleteHappy quilling!