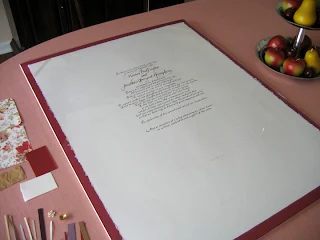
One of the most interesting commissioned pieces I've been asked to quill was a Quaker marriage certificate. My task was to design a floral border to surround hand calligraphed vows that would be spoken by the couple during their wedding. Often a hand painted design decorates a document such as this, but the bride-to-be knew about paper filigree as she had been a student in one of my classes. Monica had taken to quilling like a duck to water; in fact, she added her own work to their handmade invitations, place cards, and programs - quite an undertaking!
You can see the beautiful papers she used for the invitations in this picture, just to the left of the (large!) certificate. Monica brought samples along to help select quilling paper colors when she dropped off the certificate at my home. As you can see, calligrapher Riva Brown in Wilmington, Delaware had already worked her magic.
I'm sure Monica would have done a fine job on the document, but since she was still quite new to quilling, she didn't want her novice status framed on their dining room wall forever after... completely understandable.

Just to give you a little background, a marriage certificate is a Quaker wedding tradition. Because of its Quaker beginnings, the state of Pennsylvania offers two types of marriage licenses. One requires an officiator (pastor, rabbi, justice of the peace); the other, created specifically for Quakers, but available to anyone, allows couples to be married with legal witnesses. The certificate is signed by the bride and groom and two witnesses chosen by them, as well as all of the guests who attend the wedding. By signing the certificate, the guests pledge their steadfast support of the couple in their marriage. I think it's lovely to have a constant reminder of the spoken vows, as well as the names of those who were present at the marriage on display in one's home. Even in a non-Quaker wedding, it would be a nice idea to do this instead of a traditional guestbook.
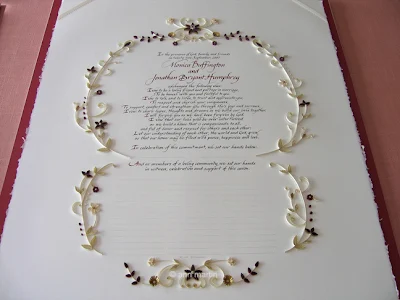
I created a balanced floral design in the chosen color scheme of burgundy, cream, and gold - just perfect for an early autumn wedding.

To avoid errant glue marks on the finished piece, I first assembled the floral and scrolled components as much as possible and then mounted them as units directly onto the document. Because it was such a symmetrical design, any mistake would be obvious, so... there simply couldn't be any oops moments. It was quite the painstaking process as each section was set down in the location that I measured out and dotted with faint pencil marks beforehand. Needless to say I found myself constantly stepping back to survey the placement, often looking at the board in a mirror to check again. Two sections ready to be placed:

I find the best way to handle gluing for a large scale project like this is to spread a thin layer of paper glue on a non-stick surface; a large Styrofoam tray works well. Holding the quilling with tweezers, I touch it gently to the glue, and immediately place it on its ..um... final resting place, for lack of a better term. There's no second guessing and repositioning as that would leave a telltale snail trail of glue. After getting all of the large segments in place, the very last step was to add tiny tight coils as accents.
Here's the finished piece, ready for the big day. At the wedding a large sheet of paper was placed loosely across the lined section at the bottom as guests signed their names. The apron was slid down as each row was filled in; this helped to avoid smudges.


