How to: Make a Modern Quilled Heart Necklace
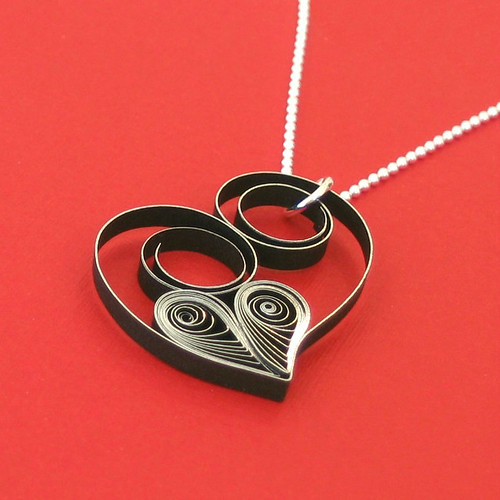
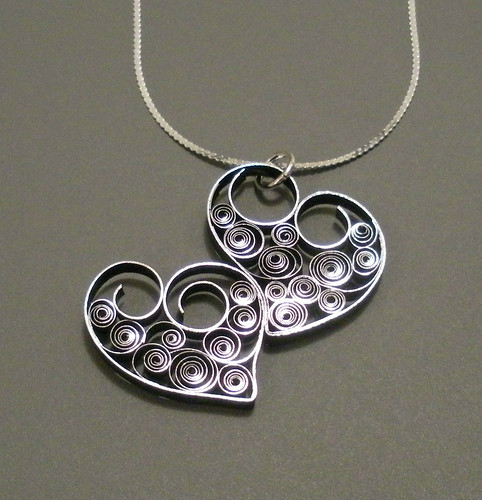
With Valentine's Day on the horizon, I had fun designing a modern quilled necklace that could be a gift for yourself or someone you love. Granted, heart jewelry is most often geared toward little girls, but perhaps black and silver paper shaped into an asymmetric heart looks somewhat sophisticated. I like to think so anyway... humor me?
Supplies:
1. Make outer heart:
a. Stack and glue three 8-inch (20cm) strips making sure all have the silver edge facing the same direction. Begin by applying glue to one side of a strip, lay another on top, repeat process with third strip. While the glue is still wet, wipe strip gently with a damp cloth to remove any excess glue. Set strip aside to dry completely (overnight is ideal). The layers may separate when shaped if the glue hasn't had a chance to fully cure.
b. When the strip is dry, refer to photo and fold it off-center. Roll each strip end around the handle of paper piercer or quilling tool.
c. Pinch point firmly to sharpen and curve to one side.
d. Apply a small amount of glue where coils meet.
Tip: You can use lightweight card stock instead of quilling paper to make the heart outline and a silver metallic pen to edge the strip. Be sure to cut the card stock with the grain (usually the longest dimension of a sheet) so it will roll smoothly. I wouldn't recommend card stock for the inner heart however, as it is generally too thick for quilled coils. Plain black paper would look nice if you don't have silver-edge quilling paper or you can lightly press the heart into a silver stamp pad for a bit of metallic shine.
2. Make inner heart:
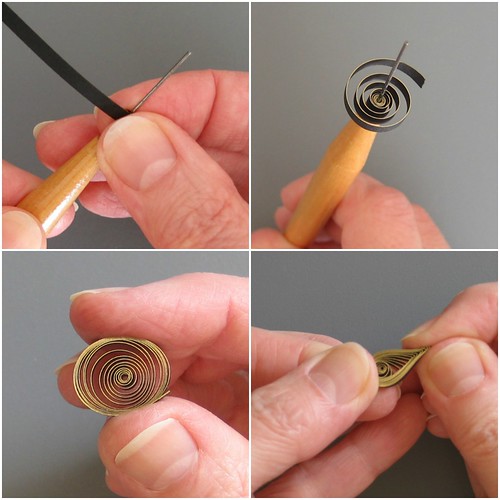
a. Dampen fingertips and roll a 12-inch (30.5cm) strip on the quilling tool. Use your thumb and index finger of whichever hand feels most comfortable, applying even and firm pressure while holding the tool handle with the other hand. Be sure to roll the paper, not the tool.
b. Allow the paper to relax into a loose coil
c. Slide it off the tool and compress the coil.
d. Pinch one end to a sharp point and curve it to the side. (This is called a shaped teardrop in quill-speak.)
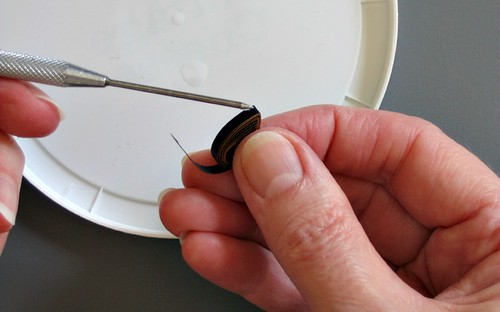
e. Apply a small amount of glue to teardrop point and press end in place for a moment. Trim excess paper.
f. Repeat process to make a second shaped teardrop the same size as the first.
g. Glue the two teardrops side by side to create a heart.
3. Assemble pendant:
a. Glue teardrop heart inside the heart outline.
Tip: If desired, apply a spray or brush-on satin acrylic varnish to give the paper water resistance and extra durability. I usually recommend this only if you live in a high humidity area.
b. Attach jump ring to right coil of outer heart.
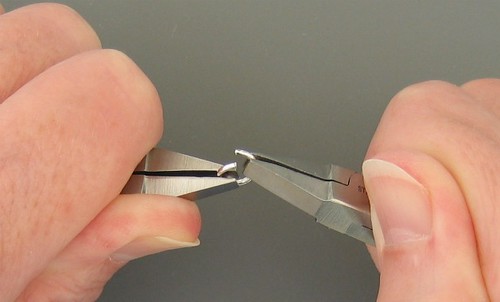
Tip: To open and close a jump ring smoothly, grasp each side of the split with pliers. Use a twisting motion to open the ring and close it by reversing the motion.
c. Slip a chain through the jump ring and enjoy your new creation!
Another idea is this necklace I designed for Creative Paper Quilling. It combines heart-shaped outlines with loose coils. There are quite a few quilled jewelry patterns in that book and also several in All Things Paper.
It truly isn't hard to do and you can make at least five or six pendants from just one package of quilling paper. Pretty sweet!
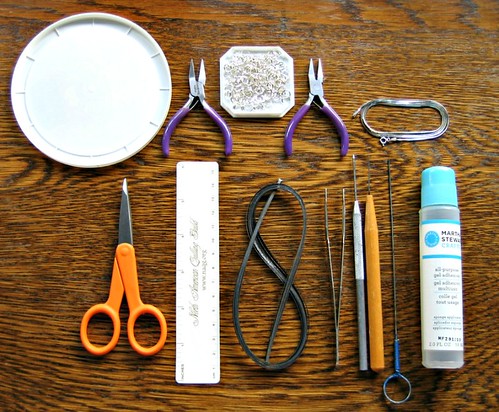
Supplies:
Quilling paper - 1/8 inch (3mm) silver-edge black
Quilling needle tool - you can use a cake tester or slim, stiff wire as a substitute
Scissors
Ruler
Tweezers - I like these with a precision tip
Glue - my favorite is Scotch Clear Glue
Paper piercing tool - to apply glue
Plastic lid - use as glue palette
Damp cloth
Jewelry pliers - two pairs, mine are flat nose
Jump ring - silver - mine is 7mm; you'll want to use one that accommodate both the paper and your chain of choice
Necklace chain
Additional quilling and paper craft supplies can be found in my Amazon shop.
Instructions:
1. Make outer heart:
a. Stack and glue three 8-inch (20cm) strips making sure all have the silver edge facing the same direction. Begin by applying glue to one side of a strip, lay another on top, repeat process with third strip. While the glue is still wet, wipe strip gently with a damp cloth to remove any excess glue. Set strip aside to dry completely (overnight is ideal). The layers may separate when shaped if the glue hasn't had a chance to fully cure.
b. When the strip is dry, refer to photo and fold it off-center. Roll each strip end around the handle of paper piercer or quilling tool.
c. Pinch point firmly to sharpen and curve to one side.
d. Apply a small amount of glue where coils meet.
Tip: You can use lightweight card stock instead of quilling paper to make the heart outline and a silver metallic pen to edge the strip. Be sure to cut the card stock with the grain (usually the longest dimension of a sheet) so it will roll smoothly. I wouldn't recommend card stock for the inner heart however, as it is generally too thick for quilled coils. Plain black paper would look nice if you don't have silver-edge quilling paper or you can lightly press the heart into a silver stamp pad for a bit of metallic shine.
2. Make inner heart:
a. Dampen fingertips and roll a 12-inch (30.5cm) strip on the quilling tool. Use your thumb and index finger of whichever hand feels most comfortable, applying even and firm pressure while holding the tool handle with the other hand. Be sure to roll the paper, not the tool.
b. Allow the paper to relax into a loose coil
c. Slide it off the tool and compress the coil.
d. Pinch one end to a sharp point and curve it to the side. (This is called a shaped teardrop in quill-speak.)
e. Apply a small amount of glue to teardrop point and press end in place for a moment. Trim excess paper.
f. Repeat process to make a second shaped teardrop the same size as the first.
g. Glue the two teardrops side by side to create a heart.
3. Assemble pendant:
a. Glue teardrop heart inside the heart outline.
Tip: If desired, apply a spray or brush-on satin acrylic varnish to give the paper water resistance and extra durability. I usually recommend this only if you live in a high humidity area.
b. Attach jump ring to right coil of outer heart.
Tip: To open and close a jump ring smoothly, grasp each side of the split with pliers. Use a twisting motion to open the ring and close it by reversing the motion.
c. Slip a chain through the jump ring and enjoy your new creation!
Another idea is this necklace I designed for Creative Paper Quilling. It combines heart-shaped outlines with loose coils. There are quite a few quilled jewelry patterns in that book and also several in All Things Paper.
Stay tuned for another Valentine's Day DIY coming up next week.
{Edited to say it's posted! Free Spirit Heart}
All Things Paper is an Amazon and AWIN (Etsy) affiliate.
{Edited to say it's posted! Free Spirit Heart}
All Things Paper is an Amazon and AWIN (Etsy) affiliate.


