Quilled Snowflake Ornament / Flower Pendant Tutorial
The #1 most frequently searched term here at ATP is quilled snowflake. In the past I've posted traditional rolled coil patterns here, here, and here, so this time I decided to make a snowflake (or if you prefer to think spring, it's a flower pendant) from folded strips of paper instead. The beauty of folding, or more precisely, alternate side looping (in quill-speak), is that you don't need a quilling tool - just use your fingers!
Quilling paper - 1/8 inch (3mm) - you can make several ornaments from one package so this is an inexpensive project
Slotted quilling tool - to roll the center coil; substitute a stiff wire/cake tester/cocktail stick if you don't have a tool
Glue - I use a clear gel adhesive. White glue that dries clear would be fine too.
Plastic lid or contact lens case - use as glue palette
Paper piercing tool or cocktail stick - to apply glue
Scissors - detail
Ruler
Tweezers
Straight pin with ball head
Ornament cord - gold/silver
Additional quilling and paper craft supplies I recommend can be found in my Amazon shop.
Instructions
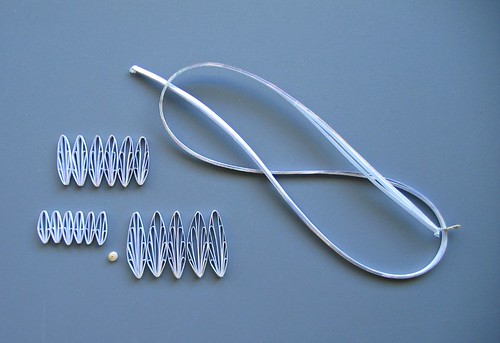
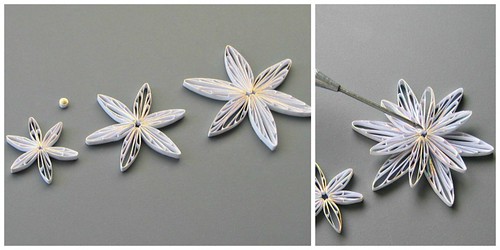
For each layered snowflake, you'll make 18 snowflake arms in three sizes - small, medium, and large, 6 of each. (what? you didn't realize snowflakes have arms? oh they do!) My three sizes measure .50 inch (13mm), .75 inch (19mm), and 1 inch (25mm), and the completed snowflake is a bit wider than 2 inches (5cm). You'll also need to make one quilled tight coil to tidy up the center space.
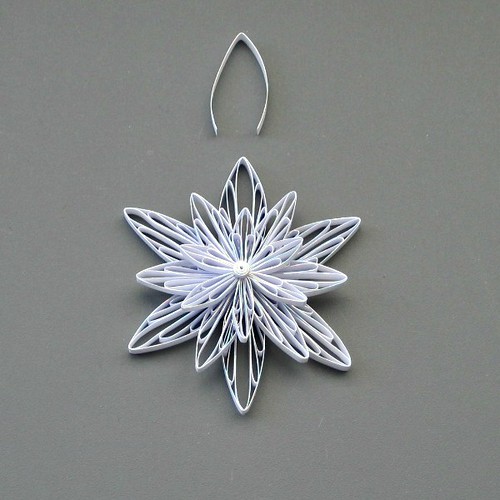
Perhaps you've noticed there are only 17 arms in the photo. That's because we're going to make the last one together!
Let's get started... (it will seem like a lot of steps, but they they go fast.)
Step 1: Make the snowflake arms.
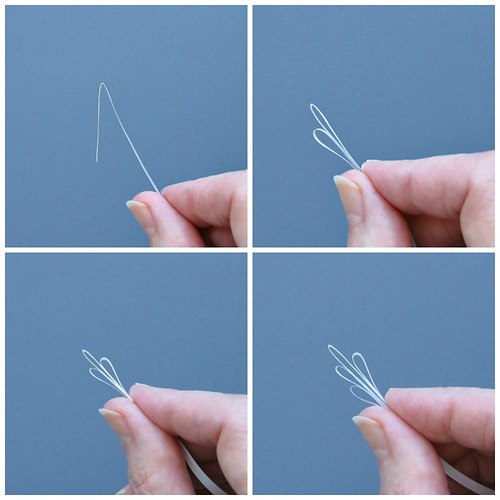
a. Begin by making a fold at one end of a quilling strip. The fold should be as long as you would like the finished arm to be, for example, 1 inch for the large arms.
b. Without cutting the strip, bring it up from the bottom of the fold to make a loop to the left that isn’t quite as tall as the fold.
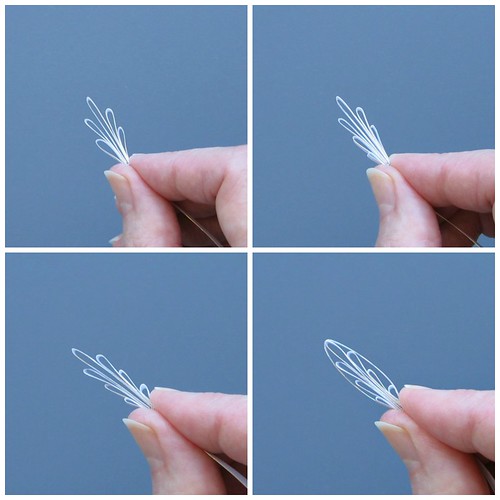
c. Make a second loop, this one to the right of the fold. Continue making pairs of loops in descending sizes, as many pairs as desired. I made three pairs for my large arms, two pairs for the medium arms, and just one pair of loops for the small arms.
d. Encircle all of the loops with the same continuous strip to create a collar.
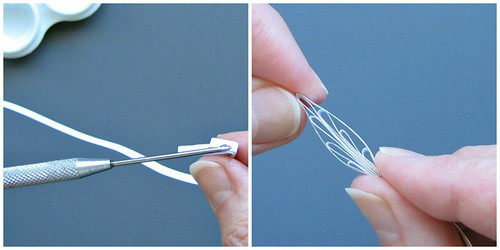
e. Glue the end in place and gently pinch the top of the collar to create a point at the tip.
f. Trim excess strip at the bottom. Tip: If you run out of paper while making loops, glue and trim excess at bottom, then glue the end of another strip in place and carry on making loops and collar.
Step 2: Make a tight coil center.
a. Slide one end of a 3-inch quilling strip into the quilling tool slot. Turn the tool to roll the paper into a tight coil. Hold the coil end in place and pick up a tiny amount of glue from your plastic palette with the tip of a paper piercing tool or cocktail stick. Touch the glue to the strip end, hold it in place for a few moments, then slide the coil off the tool. Tip: A torn strip end blends/looks better than a sharply cut end.
b. Press the ball head of a straight pin against one side of the tight coil to create a small dome. Apply a bit of glue inside the dome to preserve the rounded shape.
Step 3: Assemble snowflake.
a. Glue 6 of each arm size in a circle as shown above; allow glue to set, then apply glue to the under-center of the medium arm layer and stack it on top of the large arm layer, taking care to stagger arms so they aren't positioned directly over one another. Repeat with the small arm layer. Tip: Tweezers help a lot at this stage of the game.
b. Glue the domed tight coil in the center of the snowflake.
c. Fold a short strip of quilling paper in half and glue it as a reinforcing layer around the collar of the arm you've chosen to be the ornament top.
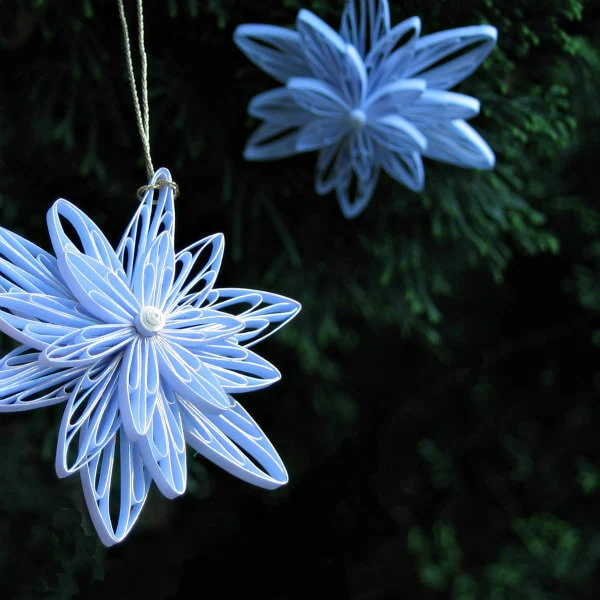
d. Fold a 10-inch piece of metallic cord in half and slip loop end through the reinforced collar and longest loop. Slip the loose ends through the loop and tie ends in a knot. Hang the ornament on your Christmas tree or in a window to enjoy all winter long. You could even attach a jump ring and chain instead of the cord and wear it as a necklace.
JJ Quilling Design in England produces edged quilling strips in a variety of metallic colors, pearl, and holofoil finishes. [edit: 2022, the company has been sold, however, Quilled Creations in the U.S.offers beautiful metallic edge strips in a number of colors] I used white 1/8 inch (3mm) strips with gold, silver, pearl, gold holofoil and silver holofoil edging to make a flurry of snowflakes; each type handled beautifully. Of course plain white quilling paper makes pretty snowflakes too, and you could even cut your own strips from a sheet of computer paper.
Supplies
Quilling paper - 1/8 inch (3mm) - you can make several ornaments from one package so this is an inexpensive project
Slotted quilling tool - to roll the center coil; substitute a stiff wire/cake tester/cocktail stick if you don't have a tool
Glue - I use a clear gel adhesive. White glue that dries clear would be fine too.
Plastic lid or contact lens case - use as glue palette
Paper piercing tool or cocktail stick - to apply glue
Scissors - detail
Ruler
Tweezers
Straight pin with ball head
Ornament cord - gold/silver
Additional quilling and paper craft supplies I recommend can be found in my Amazon shop.
Instructions
Perhaps you've noticed there are only 17 arms in the photo. That's because we're going to make the last one together!
(See what I did there? I made it sound like I photographed 17 on purpose. So not true, ha!)
Let's get started... (it will seem like a lot of steps, but they they go fast.)
Step 1: Make the snowflake arms.
a. Begin by making a fold at one end of a quilling strip. The fold should be as long as you would like the finished arm to be, for example, 1 inch for the large arms.
b. Without cutting the strip, bring it up from the bottom of the fold to make a loop to the left that isn’t quite as tall as the fold.
c. Make a second loop, this one to the right of the fold. Continue making pairs of loops in descending sizes, as many pairs as desired. I made three pairs for my large arms, two pairs for the medium arms, and just one pair of loops for the small arms.
d. Encircle all of the loops with the same continuous strip to create a collar.
e. Glue the end in place and gently pinch the top of the collar to create a point at the tip.
f. Trim excess strip at the bottom. Tip: If you run out of paper while making loops, glue and trim excess at bottom, then glue the end of another strip in place and carry on making loops and collar.
Step 2: Make a tight coil center.
a. Slide one end of a 3-inch quilling strip into the quilling tool slot. Turn the tool to roll the paper into a tight coil. Hold the coil end in place and pick up a tiny amount of glue from your plastic palette with the tip of a paper piercing tool or cocktail stick. Touch the glue to the strip end, hold it in place for a few moments, then slide the coil off the tool. Tip: A torn strip end blends/looks better than a sharply cut end.
b. Press the ball head of a straight pin against one side of the tight coil to create a small dome. Apply a bit of glue inside the dome to preserve the rounded shape.
Step 3: Assemble snowflake.
a. Glue 6 of each arm size in a circle as shown above; allow glue to set, then apply glue to the under-center of the medium arm layer and stack it on top of the large arm layer, taking care to stagger arms so they aren't positioned directly over one another. Repeat with the small arm layer. Tip: Tweezers help a lot at this stage of the game.
b. Glue the domed tight coil in the center of the snowflake.
c. Fold a short strip of quilling paper in half and glue it as a reinforcing layer around the collar of the arm you've chosen to be the ornament top.
d. Fold a 10-inch piece of metallic cord in half and slip loop end through the reinforced collar and longest loop. Slip the loose ends through the loop and tie ends in a knot. Hang the ornament on your Christmas tree or in a window to enjoy all winter long. You could even attach a jump ring and chain instead of the cord and wear it as a necklace.
All Things Paper is an Amazon and AWIN (Etsy) affiliate.


