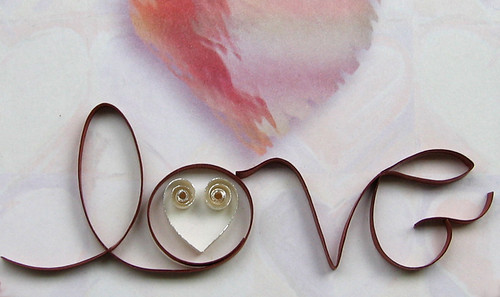
Quilled Valentine - Cursive Lettering Tips
We've been seeing a good bit of on-edge quilled lettering in recent months and it's refreshing to watch this new trend develop. Box-style printing is popular, but I began wondering if cursive script would be easier to do.
Because there are no sharply angled corners, a word can be divided into sections instead of shaping each letter individually. I made the loops of the l and o as one unit, and the v and e are another. Lastly, I added a tail to the l and a flourish on the e.
Here are some thoughts I jotted down while in the lettering zone - hope you'll find them useful:
1. Lightweight cardstock is ideal for on-edge letters, but because I have more colors of quilling paper than card, I usually use that. Any brand will do provided two strips are glued together to double the strength. The extra thickness, plus glue, makes the paper strong enough to stand on edge.
2. To glue two strips together, spread glue down the length of one strip with your fingertips. When the strip is thoroughly coated, place the second strip on top. Gently wipe away any glue that seeps out along the edges by running a damp cloth down the strip a few times. Set the strip aside and don't even think about rolling it until the glue has dried completely. Trust me on that; the paper will just buckle if it's damp. Major frustration ensues!
3. If cutting your own strips from a sheet of paper or cardstock, it's important to slice with the grain so the coils roll smoothly. You may need to roll a strip cut from each direction of the sheet to determine which way the grain runs; usually it's the length. (hmm, that doesn't sound clear; try it and I think you'll see what I mean.)
4. Sketch the design of your letters, or find a font online and print out the word in whatever size you like. You can shape your letters right on top of the pattern.
5. To curve the letters, run the strip along the side of your needle tool (or round toothpick, paper piercing tool, stiff wire - whatever you have on hand) as if you were curling paper ribbon.
6. When the letters are ready to be placed on the background paper, spread a thin layer of glue on a non-stick surface. I use a Styrofoam tray or the lid of a plastic container. Holding the letter(s) with tweezers, touch the underside to the glue and place the letters directly on the paper. Try not to slide them into place, as this will leave a snail trail of glue. Even though glue dries clear, the shine will be obvious.
I'll have another quilled Rennie Mackintosh-inspired card coming up soon... am a bit obsessed with his work at the moment. There will be more on-edge script examples later in the week too, so stay tuned.
If you'd like to receive my occasional All Things Paper newsletter that features posts like this one, sign up here. Quilling and other paper craft supplies I recommend can be found in my Amazon shop.
Looks great Ann.. thanks for the tips on this.. it is lovely and adds dimension to the card...
ReplyDeleteKath
xx
Ann, I love your quilled cursive script and your colours are lovely together. The metallic edged heart inside the 'o' is effective. I also like Rennie Mackintosk inspiration and thanks for your how to do tips.
ReplyDeleteLicia
Ann, thank you for the wonderful tips. The picture is wonderful.
ReplyDeleteTeddie
great tips Ann. I have done very little lettering but now you have inspired me.
ReplyDeleteThe look of the cursive is wonderful and your tips are great Ann!
ReplyDeleteReally sweet looking card Ann, I have tried cursive lettering and I love it . Thanks for the tips Ann, I almost always find the most round about ways when I am crafting .Cutting paper with the grain of the paper is a nice tip Ann and very useful.
ReplyDeleteYou've provided answers for just the kind of questions I always have for you! Thanks for this, Ann!
ReplyDeleteKarren
thanks for all the tips. I have a real problem with waiting for things to dry. I'm very impatient :)
ReplyDeleteEverything you said was totally spot on! Thanks for sharing and teaching. ;)
ReplyDeletethanks for the tips!
ReplyDeleteHi,
ReplyDeleteI've nominated you for a Versatile Blogger Award - http://hersenskim.blogspot.com/2012/02/versatile-blogger-award.html
Wonderful card, Ann. Makes my fingers itch to play with this too! Thanks for sharing your methods.
ReplyDeleteCecelia
Great topic. I've been wondering how quilled lettering is done. I haven't seen much info on the subject.
ReplyDeleteThanks everyone, I'm glad you liked the tips.
ReplyDeleteThank you, thank you! I've been searching for more info on this for days... and this answered my questions
ReplyDeleteHi Caz, I'm glad to hear that!
DeleteBeautiful!
ReplyDeleteThanks Pamela!
Delete